The Prehistoric Statue Collection
EuroSpore :: Games Forum :: World Builder & Creative :: Spore and Galactic Adventures :: Creator Corner
Page 1 of 2 • 1, 2 ![]()

The Prehistoric Statue Collection
![]() by Dino589 Sat Jun 05, 2010 9:09 am
by Dino589 Sat Jun 05, 2010 9:09 am
I figured there were enough of these (or soon will be, and that they are of a good enough quality) to merit a thread of their own, and plus I think some sort of log or database of them would be rather convenient (for me especially, and I hope you guys like them all too).
So, I make statues and recreations of various prehistoric fauna in the Spaceship and Vehicle editors. They have basically become my staple design. Each statue is designed to create an accurate depiction of the animals, in a realistic pose and/or with realistic scenery. Each statue usually has a slightly modified and simplified counterpart uploaded onto my Spore profile, while the full statues use Freedom (typically just the removal of a couple non-essential details), so a collection of the small PNGs shall be here as well.
List of Satues So Far:
~Tyrannosaurus vs Triceratops (retired)
~Battling Tylosaurus (retired)
~Roaring Tyrannosaurus
~Allosaurus
~Fishing Therizinosaurus
~Quetzalcoatlus (nearing completion)
~Spinosaurus (nearing completion)
~Deinonychus vs. Tenontosaurus (to be made)
~Dueling Medusaceratops (to be made)
~TBA
~TBA
~TBA
~TBA
~TBA
~TBA
Gallery of Statues:


Collection of PNGs:


Like the statues but want them to be shared? Then don't worry, you can subscribe to the sporecast for the ship's sharable counterparts here.
Though, it should be noted, all the ships there are trimmed down versions of the ships here, and therefore are forced to have details removed.
Last edited by Dino589 on Mon Sep 27, 2010 3:05 am; edited 6 times in total

Dino589- Delegate

-

Spore Name : Dino589
Age : 28
Re: The Prehistoric Statue Collection
![]() by Dino589 Sat Jun 05, 2010 9:09 am
by Dino589 Sat Jun 05, 2010 9:09 am

(Quetzalcoatlus. Note: Is painted, though this pic was taken before then. Pose is just for show.)

(Spinosaurus. Note: Pose is just for show. Will not have a sharable counterpart.)
Guides:
Building Your Ship
This tutorial follows the construction process. For my purposes, it shall be a dinosaur, but most of the tips in this particular tutorial can be applied to just about anything (real animals, mythical animals, mechs, what have you, though you will likely have to adapt it to suit your needs). Click below to see the full tutorial:
- Spoiler:
- Right, first thing's first. Before you can get all fancy with doing any crazy action scenes and crap, you need to actually make your ship. Let's get started, shall we?
First of all, come to a decision of what you want to make. You don't necessarily need to decide right away, but near the beginning for sure. For the purposes of these guides, I shall be making an Allosaurus. Allosaurus was a fairly 'general' dinosaur, so its a good animal to use for a demonstration.
It is usually a good idea to look up a couple pictures of the creature in question to use as a reference. Prehistoric animals in particular can be tricky too; there are alot of good artist restorations out there, alot of good ones, and alot of bad ones too. If accuracy is something you want to keep in mind, then mind the pic you choose. Personally, I like working from skeletals. In my case I'll be using this skeletal by Scott Hartman (who actually has a site specifically for skeletals, if any of you are of a similar mind).
http://www.skeletaldrawing.com/psgallery/pages/allosaurus.html
Now that that's done, onto the actual construction process.
A couple things ot keep in mind throughout the build:
You want to use as few parts as possible where you can. Its better to use a single part for something that you could otherwise use five on if you can help it.
Its OK to make it slightly OVERLY COMPLEX at this point.
NEVER use Asymmetry on it during the construction phase.
First up, grab a body, to use as the... Well, body. For my way of building, it is important to use a MAXIMUM OF ONE BODY PART per animal (it is possible to do it with none... kinda. Though I am still working it out), so choose wisely. Personally, I think the Tipped Plug works best, for dinosaurs at least. With a bit of tweaking it really fits the shapes in most cases.
Once you have your body chosen and adjusted to your liking. Next, take a Sillynder, slim it down and stretch it out, stick it on one end, and rotate it so that it sticks out the opposite end. This will provide the base for the neck and tail. You will notice that, where the base of the tail is, there is a large dip between the tail and the rest of the spine. I fill this with a Hedge Row.
Next, take more Sillynders and stick them on the back end, so that they gradually taper to a point. This forms the tail. Anywhere from 3-5 works, depending on how flexible you want it. I usually like giving it a slight wavy curve as well.
Do a similar process for the neck, although without as many Sillynders. Usually two works. They should make a slight S shape. But, you will notice that there is a large gap in the neck now. To fill it, 'pop' the second part out of place (this is something you will likely need to do at several other points throughout the build), and attach a Tear Drop to it. Pop it back into place, and adjust the tear drop as need be.
Now for the head. The Bicycle Seat usually works well, either by itself or as a base for a couple other parts. I put one on the end of the neck for the upper jaw.
For the lower jaw, pop the upper jaw out of place attach the part that will be your jaw to it.
Pop the upper jaw back into place, and fix the proportions of the lower jaw. It now has a moveable mouth. A Duck Bill fills the space between the two parts, although that is something that sometimes I do and sometimes I don't.
To add teeth, I position the camera at a low angle, zoom in, open the mouth, and thus it makes things much easier for me to access the mouth, and add whatever teeth I want. You will also notice that I have added eyes onto the head as well. I usually finish the rest of the head outright at this point, however here I decided to leave that for later.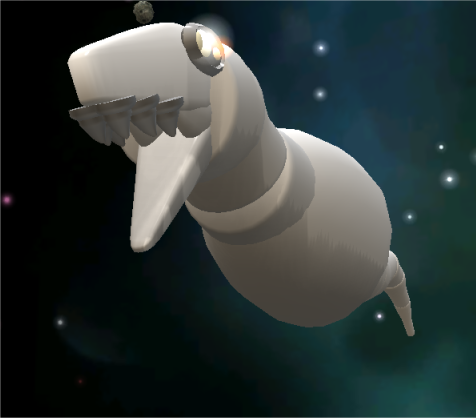
To give you a better idea of what the piece looks like thus far:
Now, we move onto the legs. You do not want to just stick the legs right onto it. Instead, you want to sink them in. Now, here is one of the tricks which I have discovered and which I have found quite useful. You can sink body parts into the body, right? Right. Now, how do you sink detail parts into a ship? The conventional way is, of course, to attach it to a body and sink that into the ship. Problem is, if we do that here, the legs will remain stationary while the rest of the ship does not. So, how do we sink detail parts into other parts without the use of a body? Simple.
Take a Sillynder again, make it as narrow as possible as well as a little longer, and stick them on the body. Be mindful of where you stick them as these will be your pivot points for the limbs. Once you've done that, rotate them 180 degrees so that they stick out the opposite side.

Now, put the parts on the ends that will be the base of the limbs. Grabbing the Sillynders again, shorten them so that the legs sink into the body.
Sillynders are once again used, this time for the rest of the legs. Its the same process for the arms and legs. You will also notice that, at this point, I had decided to swap out the teeth for something a little less large and cartoonish but using Hedge Rows.
You will notice now though, that there is a considerable gap where the knee is, and it doesn't look good at all. To fix this, pop the leg out of place, and attach a Tear Drop to it, rotating it back to fill out the leg, also giving it more bulk and muscle.
The process for making the fingers and toes is the same: use small Sillynders with The Horns at the end for claws. I always make one, then duplicate it so I have the desired number of digits, and tweak each digit as necessary.


Now, I go back, and add any missing details. In this case, it means adding the crests and ridges on Allosaurus' head. I decided to add a tongue while I was at it. A fourth toe, the dew claw also known as the hallux, has also been added onto the leg. By now, I am a little ways over the complexity meter, but that is perfectly fine. You shall see why in the Posing tutorial. I then proceed to make any tweaks I want. Personally, I am a madman when it comes to tweaks, and can spend days just slightly modifying things to make them look more right. In the end, you shall have your end result:


Now that your ship is done, the next step is to paint it. The next tutorial covers such content.
Colouring and Advanced Painting Techniques
This tutorial covers how to paint your ships, along with several neat little tricks that can enhance its appearance. Click below to see full tutorial:
- Spoiler:
- This tutorial, which is less picture heavy, basically picks up where the last one left off, and continues the developement of the Allosaurus. Some of you will probably find nothing new here, but whether or not you decide to skip it is entirely up to you.
So, you've got your ship, now what? You obviously aren't going to leave it solid white, are you? No, of course not!
There are a number of ways to start. You can either make up your own colour scheme, find a pic off google and try to base it on that, put down random patches of colour and work from there, use the Paint Like option and fix it up, etc. Personally I like doing all the painting myself, and also like to make my own colour schemes (though often draw inspiration from other sources). Since Allosaurus was an active predator, I think I shall make it suitably leopard-like in colour and use mostly shades of brown.
I'm going to start by getting a 'base layer' of paint down. When painting, it is important to consider both texture and colour. Page 5 has lots of nice scale patterns, as well as several other patterns which I often end up using. Basically, if your making a dino, dragon, or similar animal, the only page you really need to use is Page 5. If you use two colours of a similar hue and tone with the texture that is the first in the third row (on Page 5) can make an animal look almost fluffy (see the Therizinosaurus). Textures and page 6, which are much smoother and shinier, are good for marine animals (see the Tylosaurus). I don't usually use many other textures on the other pages though, since, afterall, animals are organic.
Personally, my favourite is on page 5, the first in the fourth row. It has lots of wonderful texture which can really pop, and the patterning can be either subtle or striking. It is what I shall use on the Allosaurus. be careful with it though, as sometimes depending on how you paint it you can make the texture hard to see, and end up making it look like it is covered in strange blotches.
As you go, you will want to make sure you look at it from all angles and double check your work. It is incredibly easy to miss a spot of white.
The second texture in the second row on page 5 is another one I like using, usually for the tongue and inside of the mouth, due to its shine and texture.
Next up is an interesting technique: adding gradients. Gradients can make an animal really look cool if done properly. I am going to make the tail go from the normal body colour to white. For those of you who have already done that sort of stuff on other ships or buildings and stuff, you should have no trouble. I start with my two end points, and gradually blend them together. The blending is done by picking shades that are similar to the two you are trying to blend, and paint the sections so there appears to be a gradual shift.

Its not perfect, but I usually go back and make tweaks. In the meantime, though, I'll paint the face. I'll make the teeth a pale shade of yellow, since, afterall, dinosaurs did not have perfect hygiene so they should not be white, paint the crests flaming red, the area around the eye black, and the eye itself a light blue to contrast with the black surrounding it as well as the yellow-brown of the main animal. I don't know why I use lights for eyes or always make the eyes a light contrasting colour and the area around them dark. Thats just my style.
Finally, I go back and make whatever tweaks I want. In this case, I fix the blending in the tail, make the hands and feet transition from dark brown to the body colour, and make the rest of the face black and white which once again transitions to the body colour. I also decide to make the patterning on the main torso stand out more. The final result:
Process from start to finish:

Now that you are done the construction of your ship, the next step is to bring it alive however you choose, which the next tutorial shall cover.
Posing Your Ship and Diorama Elements
This tutorial shall explain tricks and ideas to pose your new creations, as well as some tips for constructing a diorama or scenery objects around it.
Coming Soon
List of Common Parts:
This list is of all the parts I frequently use. You do not necessarily need to use all of them, and sometimes of course I will use other parts as well. And of course, you may find other uses for parts, or parts that suit your uses better.
~Tipped Plug (Body. Good for bodies.)
~The Glowport (Effect. Good for eyes.)
~Portal of Light (Effect. Good for eyes.)
~The Horns (Detail. Good for claws, teeth, ridges and similar fine detailwork.)
~Sillynder (Detail. Good for tails, necks, limbs, digits, being a connector, facial features. Highly versatile and useful.)
~Bicycle Seat (Detail. Good for limbs, heads, jaws.)
~Tear Drop (Detail. Good for filling gaps.)
Last edited by Dino589 on Tue Aug 03, 2010 5:25 am; edited 10 times in total
Dino589- Delegate
-
Spore Name : Dino589
Age : 28
Re: The Prehistoric Statue Collection
![]() by Vektrix Sat Jun 05, 2010 9:13 am
by Vektrix Sat Jun 05, 2010 9:13 am
Being almost alone in this field Dino, you are a true Spore Pioneer, and should anyone ever write a comprehensive history of Spore book, you would deservedly enter the hall of fame.

Vektrix- Euro Leader

-
Spore Name : Vektrix / SporeMasterVek
Location : Lancashire, England
Age : 45 -

Re: The Prehistoric Statue Collection
![]() by Aieru Sat Jun 05, 2010 9:19 am
by Aieru Sat Jun 05, 2010 9:19 am

But I suggest you learn to use the Building-editor as soon as possible, cause it offers way more details in creations. (although the objects and buildingblocks there are of less quality then the ones in the vehicle editors.)

Aieru- EuroSpore 1954

-
Spore Name : AapBurger
Age : 34
Re: The Prehistoric Statue Collection
![]() by Dino589 Sat Jun 05, 2010 10:25 am
by Dino589 Sat Jun 05, 2010 10:25 am
That is an interesting idea there, Vekky. I had originally intended for this to be a showcase for my set of ships, although that is certainly something to think about.
And that is a suggestion I have received several times, Aieru. Its a great idea, however every single time I have tried the Building Editor, I have come up with results that are far less than satisfactory, to say the least. Its far more tedious, and then the Connectors are a total pain. And, while I have looked at the All About Buildings thread, I haven't found its helped me all that much. Therefore, I have resorted to becoming a pioneer of the spaceship editor and now, the only thing the Building Editor can do which I can't is place objects anywhere in the game zone (while the vehicle editors only yet you do that on a single plane).
That PNG for the new Rex is up btw.
Dino589- Delegate
-
Spore Name : Dino589
Age : 28
Re: The Prehistoric Statue Collection
![]() by Blaze Sat Jun 05, 2010 1:33 pm
by Blaze Sat Jun 05, 2010 1:33 pm

Blaze- Delegate
-
Spore Name : Blazeer
Location : over there, over there, and up there
Age : 27 -
Re: The Prehistoric Statue Collection
![]() by Arkanay Sat Jun 05, 2010 7:37 pm
by Arkanay Sat Jun 05, 2010 7:37 pm
The first one should be featured, IMO.
It's, I dare say, perfectly made, tells a story and is quite original.

Arkanay- EuroSpore 2007

-
Spore Name : Arkanay
Age : 33
Re: The Prehistoric Statue Collection
![]() by Dino589 Wed Jun 16, 2010 11:40 am
by Dino589 Wed Jun 16, 2010 11:40 am
Also, I have recently been debating constructing a step-by-step guide on how to make creations similar to these. I remain undecided though. What do you guys think of the idea?
Dino589- Delegate
-
Spore Name : Dino589
Age : 28

Thobe- EuroSpore 1954
-
Spore Name : Thobewill
Location : Arizona, USA
Re: The Prehistoric Statue Collection
![]() by Dino589 Wed Jun 16, 2010 1:14 pm
by Dino589 Wed Jun 16, 2010 1:14 pm

Non-Freedom Therizinosaurus is up. This is going to be the model the Freedom version shall use, although the Freedom version will be fully feathered and probably have a different paint scheme too. Only wish I had enough complexity left to add some more feathers to this one, at least several on the back of the head and neck.
Dino589- Delegate
-
Spore Name : Dino589
Age : 28
Re: The Prehistoric Statue Collection
![]() by SuperLoki Wed Jun 16, 2010 8:01 pm
by SuperLoki Wed Jun 16, 2010 8:01 pm

SuperLoki- EuroSpore 1997

-

Spore Name : Rebecca1208
Age : 29
Re: The Prehistoric Statue Collection
![]() by bmpalmann Wed Jun 16, 2010 8:17 pm
by bmpalmann Wed Jun 16, 2010 8:17 pm
Great work! I'm guessing they're mainly freedom?

bmpalmann- Euro Moderator

-
Spore Name : bmpalmann/ Remyxomatosis
Location : In your unconcious mind...
Age : 31
Re: The Prehistoric Statue Collection
![]() by Blaze Wed Jun 16, 2010 10:31 pm
by Blaze Wed Jun 16, 2010 10:31 pm
Blaze- Delegate
-
Spore Name : Blazeer
Location : over there, over there, and up there
Age : 27 -
Re: The Prehistoric Statue Collection
![]() by sjhorm Wed Jun 16, 2010 10:51 pm
by sjhorm Wed Jun 16, 2010 10:51 pm

sjhorm- EuroSpore 1975

-
Spore Name : sjhorm
Location : United States of Vespucci
Age : 27
Re: The Prehistoric Statue Collection
![]() by Dino589 Thu Jun 17, 2010 6:59 am
by Dino589 Thu Jun 17, 2010 6:59 am
No, actually. The most complex one was the Therizinosaurus, which was just over the complexity meter. But, once I used asym on it, it fit right in, if only barely; I had complexity enough for just one more part (not enough for the feather crest sadly, so I had to leave it off).bmpalmann wrote:How you do those statues Dino, i have no idea!
Great work! I'm guessing they're mainly freedom?
@ Sj: How about I make a tut AND a list of the parts I use most often?
Dino589- Delegate
-
Spore Name : Dino589
Age : 28
Re: The Prehistoric Statue Collection
![]() by Dino589 Fri Jun 18, 2010 7:37 am
by Dino589 Fri Jun 18, 2010 7:37 am
Dino589- Delegate
-
Spore Name : Dino589
Age : 28
Re: The Prehistoric Statue Collection
![]() by bmpalmann Fri Jun 18, 2010 7:58 am
by bmpalmann Fri Jun 18, 2010 7:58 am

bmpalmann- Euro Moderator
-
Spore Name : bmpalmann/ Remyxomatosis
Location : In your unconcious mind...
Age : 31
Re: The Prehistoric Statue Collection
![]() by Dino589 Mon Jun 21, 2010 12:59 pm
by Dino589 Mon Jun 21, 2010 12:59 pm
Thank goodness this place has spoiler tags. I put most of it in one, since its kinda pic-heavy and lengthy too (though really, its not like you were expecting just a simple paragraph without a single pic, right?
 ).
).Oh, and I updated that List of Parts that was added too.
Dino589- Delegate
-
Spore Name : Dino589
Age : 28

Thobe- EuroSpore 1954
-
Spore Name : Thobewill
Location : Arizona, USA
Re: The Prehistoric Statue Collection
![]() by Dino589 Thu Jun 24, 2010 7:52 am
by Dino589 Thu Jun 24, 2010 7:52 am
Dino589- Delegate
-
Spore Name : Dino589
Age : 28
Re: The Prehistoric Statue Collection
![]() by Dino589 Sat Jun 26, 2010 8:53 am
by Dino589 Sat Jun 26, 2010 8:53 am
The giant pterosaur, Quetzalcoatlus.
Dino589- Delegate
-
Spore Name : Dino589
Age : 28
Re: The Prehistoric Statue Collection
![]() by bmpalmann Sat Jun 26, 2010 10:38 pm
by bmpalmann Sat Jun 26, 2010 10:38 pm
bmpalmann- Euro Moderator
-
Spore Name : bmpalmann/ Remyxomatosis
Location : In your unconcious mind...
Age : 31
Re: The Prehistoric Statue Collection
![]() by Dino589 Tue Jul 06, 2010 12:49 pm
by Dino589 Tue Jul 06, 2010 12:49 pm
Right, update on the Quetzalcoatlus from my previous update: I thought the model was finished, but after putting the paint on it I found I have much work to do. Meaning I'm not going to be uploading it as soon as I want.
On a brighter note, I have not one, but TWO new ships finished: the Allosaurus (revealed in the tutorials) and the Therizinosaurus (previewed a short while back). Both of them have more scenic diorama elements than their predecessors, and they sure aren't going to be the only ones like that. The third and final tutorial, covering the finishing of the Allo, shall be along in a few days. Enjoy.
And finally, a preview of the most epic ship I have ever made. Ever. Behold!

Yeah, purposely taken from a poor angle. Its too epic for me to want to reveal it in its full glory just yet.
Dino589- Delegate
-
Spore Name : Dino589
Age : 28
Re: The Prehistoric Statue Collection
![]() by LoD Tue Jul 06, 2010 4:37 pm
by LoD Tue Jul 06, 2010 4:37 pm
Dino589 wrote:
Yeah, purposely taken from a poor angle. Its too epic for me to want to reveal it in its full glory just yet.
What I have seen, cannot be unseen.

LoD- EuroSpore 1957

-
Spore Name : "LoD"
Age : 27
Re: The Prehistoric Statue Collection
![]() by Dino589 Thu Jul 08, 2010 11:31 am
by Dino589 Thu Jul 08, 2010 11:31 am
Well, the Allo has been shared, though you are missing literally nothing if you've downloaded the Freedom version.

And now, time for the proper reveal of the Spino.

Dino589- Delegate
-
Spore Name : Dino589
Age : 28
Page 1 of 2 • 1, 2 ![]()
EuroSpore :: Games Forum :: World Builder & Creative :: Spore and Galactic Adventures :: Creator Corner
|
|
|